Docker for Dummies - A layman introduction to Docker
Ever read the term Docker while scrolling through your twitter or RSS feed? Is it that just like me, you are aware that such a thing does exist in the industry but never actually took the pain to explore any further about it? Or maybe you did but the information on the Internet about Docker is scattered and formal for your understanding. Well, this post is all about what Docker is and how to begin using Docker on Linux.
What is Docker?
Basically, Docker is a program that allows a user to create isolated environments to run, test or/and deploy applications. These isolated environments are referred to as containers.
What that means is that anything running inside a Docker container is completely separated from any other process running on the rest of the operating system (hereinafter OS). For example, a Python developer is debugging a program that is compatible with Python 2.x but the developer himself is using Python 3.x on his host OS as that is what he uses for rest of his tasks. He can use Docker to create an isolated container which will consist of the following :
- An environment just enough to run Python 2.x
- Python 2.x
- program-to-be-debugged.py
This will allow him to work in a specific isolated part of his OS without interfering or any interference from the rest of the application and their dependencies.
Are you already thinking of an alternative? The developer might consider using a virtual machine (hereinafter VM) installed on a hypervisor like Virtualbox or VMware Workstation. VMs are isolated too. Then why not simple use that technology? How is even Docker different from Virtualbox or VMware Workstation?
Difference between Containers & Virtual Machines
Before understanding how Docker differs from Virtualbox or VMware Workstation, we need to understand the properties and differences of the technologies they are all based upon.
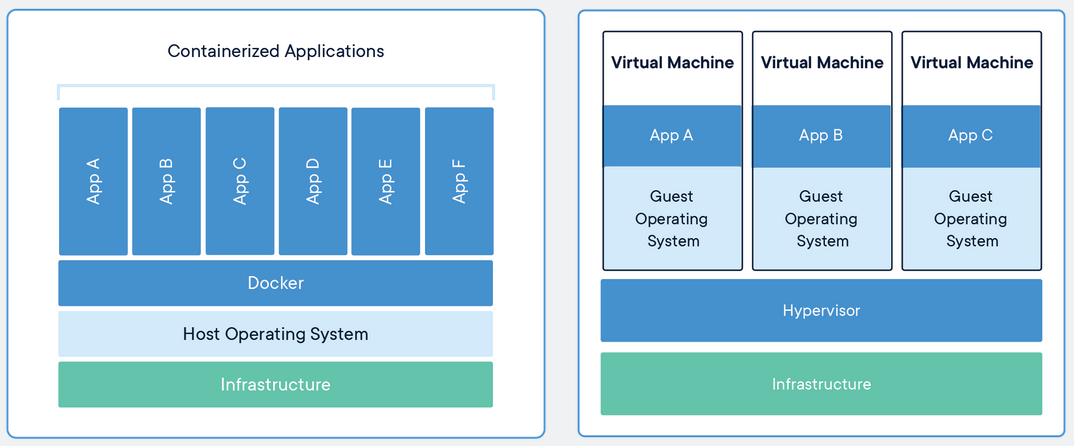
Containers are an abstraction at the app layer that packages code and dependencies together. Multiple containers can run on the same machine and share the OS kernel with other containers, each running as isolated processes in user space. Containers take up less space than VMs(container images are typically tens of MBs in size), can handle more applications and require fewer VMs and operating systems.
Docker works on the principles of containerization. A container just packs an application or a software along with all the dependencies or files it needs for its working and executes it as an isolated process. The execution uses the same kernel as the host OS.
Virtual Machines (VMs) are an abstraction of physical hardware turning one server into many servers. The hypervisor allows multiple VMs to run on a single machine. Each VM includes a full copy of an operating system, the application, necessary binaries and libraries - taking up tens of GBs. VMs can also be slow to boot.
Virtualbox and VMware works on the principles of virtualization. A VM emulates a complete computer system infrastructure with all the hardware resources like CPU, RAM, hard disks, network interfaces, etc. A VM then requires the installation of a complete OS to the virtualized hard disk. An application or a software then running inside a VM is executed by the guest OS (OS installed on the VM) kernel which sends the execution instructions to the virtualized CPU. The hypervisor has to convert these instructions from the virtualized CPU to be able to be executed by the real CPU.
This is where Docker rocks. Virtualization isn’t required in a situation where the host OS uses a kernel that can run the required application directly. It will simply result into lower speeds, more utilization of a machine’s resources and storage. In the example discussed above, the developer needs to debug a Python program and thus requires Python 2.x. He can install it on his host OS directly but also do not want to mess up his already installed Python 3.x and its dependencies. So, creating a Docker container is the best approach to solve this problem.
But, what if the developer is using Ubuntu as his host OS on his machine and wishes to test the so debugged Python program on Windows 10? This is where Virtualbox and VMware Workstation are usefull because Windows 10 comes with it’s own closed source kernel and only virtualization can create a completely isolated VM that is capable of installing a complete OS and running applications compatible with the guest OS kernel (hereby Windows 10 kernel).
Docker on Linux vs Docker on Windows/MacOS
Docker can be installed on Windows 10 or MacOS too. But it is interesting to note that the Docker containers only provide a Linux environment even on other operating systems. But how is it possible? Windows 10 kernel or MacOS kernel can not execute a program meant to be run on a Linux environment.
Earlier, Docker provided something known as Docker Toolbox that is still supported as of the time of writing this blog post. It installs Virtualbox on Windows/MacOS with a very minimal Linux VM and sort of bridges the commandline of Windows/MacOS to the VM so that Docker can be managed from the commandline of the host OS. It doesn’t make much sense, as for what we are talking, containerization is meaningless if it can’t eliminate virtualization.
But now Docker has Docker for Desktop which uses Hyper V when installed on Windows 10 and HyperKit when installed on MacOS. This will definitely result into better virtualization performance than in the case of Virtualbox, but still no match against using Docker on a host Linux system as there is zero virtualization in that case.
Docker Commandline
I’ll not be covering how to install Docker as this is not a practical, follow-up post. This is just to give you all an idea of how Docker works and what are the different terminology and commandline arguments that you should be aware of, while using Docker.
Setup: Ubuntu 18.04.3 with Docker installed.
docker images
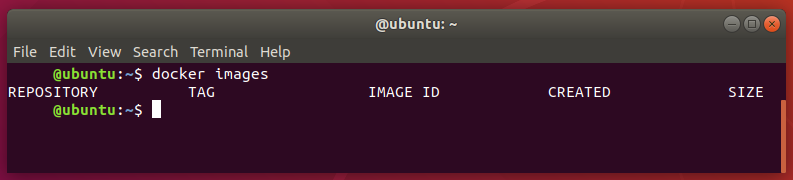
This lists all the images currently installed in Docker. These images are the foundation for creating and running containers. Since, there is no image currently present from which a container can be initiated, let’s download Ubuntu as a Docker image.
docker pull ubuntu
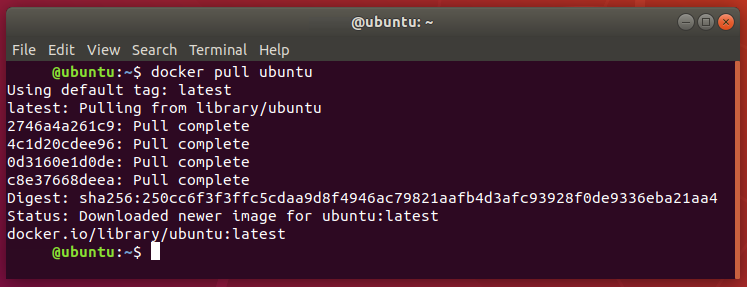
This will pull the Ubuntu Docker image present in Docker Hub. Usually one need to use docker pull repo-name/image-name:tag to pull an image. But, since Ubuntu is an official Docker image, omitting the repo-name will look for the image in official repositories. Also, when no tag is passed, it is set to latest and pulls the latest version of the Docker image. Let’s list the Docker images present again.
docker images
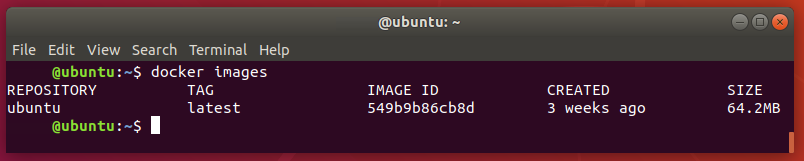
The Ubuntu Docker image is listed and we can notice how tiny the environment required for a basic Docker image is. Let’s run a container from this image.
docker run ubuntu
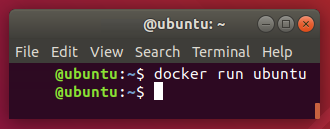
We get nothing. Hmm, strange. Let’s list the running containers.
docker ps

Still nothing. This is because we aren’t using the right way to run an image. And there is no process listed because the container created goes into an exit state immediately after the docker run ubuntu is executed. The docker ps only lists the running containers. To list stopped containers, we’ll use…
docker ps -a

There we have our Ubuntu container listed in an exit state. We’ll now re run the image correctly using the correct command.
docker run -it ubuntu /bin/bash
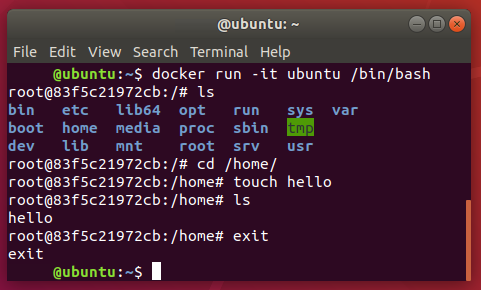
This spawns a tty pseudoshell (-t flag) and an interactive bash session (-i flag and the bin/bash argument). We also created a file hello in /home/ within our container and exit. But we forgot to type in some “Hello, World!” in the file we created. Let’s do it.
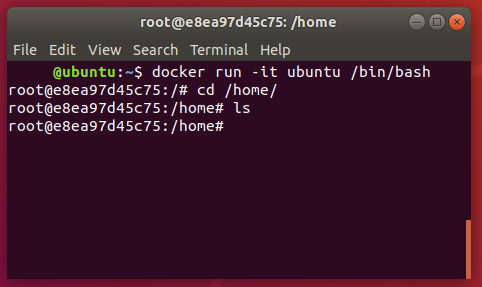
What? Really? Where’s our dear hello gone? What does that even mean? Well, this explains an important concept about Docker. We’ve been talking about the Docker images and containers but didn’t differentiate between them.
- Image: a sort of template for a new Container. This can be compared to the classes of C++.
- Container: The actual instance that runs from the image. This can be compared to the object formed from classes in C++.
So, every time we use the run option, we are creating a whole new container from the base image. The base image, ubuntu does not have the hello file, and every new container is a fresh instance of the base image which explains why our hello has been missing. Also, notice the change in the hostname when another container gets created. Let’s start from the beginning.
docker container prune
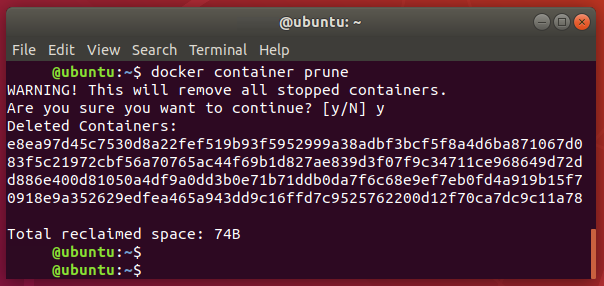
We removed all the containers we created accidently. This command will prune or remove all the stopped containers. Let’s confirm this.
docker ps -a

No containers are listed. Let’s create a new container.
docker run --name docker_is_cool -it ubuntu /bin/bash
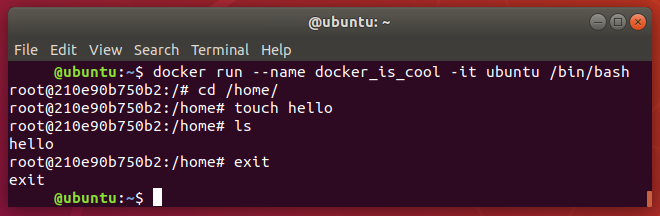
We just used the --name flag to name our container which will be useful to start and stop it later. We also created another hello in this container just to confirm later that our understanding is now correct and exit. Let’s see how to get into the same container again to access the hello file.
docker start docker_is_cool
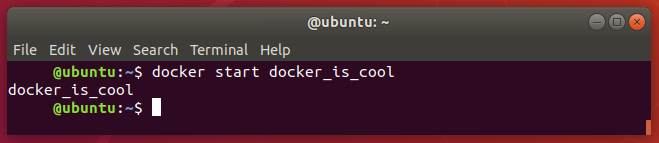
The name assigned earlier is helpful to perform actions on a container easily as we can uniquely identify a Container and also remember the identifiers, as we can see. This only starts a container. Let’s get the /bin/bash session.
docker attach docker_is_cool
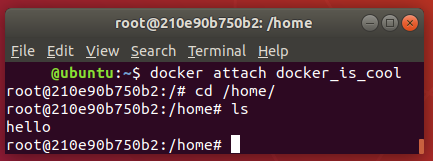
There we go. We have our hello in place.
This was a very basic introduction to Docker and we are yet to experience the wonders it can do.
Hope you like this post. See ya till the next time!